Category Archives: Baking

Mission: Find the Perfect Brownie

Chocolate Brownie6

I have been dreaming of a brownie, a dense, chocolaty, fudgy, maybe a little cakey, thick, yummy brownie. I have to confess that I have a favourite and go to recipe for almost every dessert or cake but I don’t have one for the humble brownie.

Don’t get me wrong I have made some pretty tasty, delicious brownies but I am yet to find the one that I can give my whole heart to.  And so I have embarked on a mission to find that brownie that can fill this gaping hole and I’m going to chronicle this little mission. Let the brownie games begin!

Attempt no. 1: I found a well recommended recipe on Pinterest (No Pics…) and it did prove to be chocolaty and fudgy and richly delicious. It just wasn’t what I’m looking for.

Attempt no. 2: I found this recipe through the Brown Eyed Baker website, in fact there are a few recipes on there. Again this made amazing rich, fudgy, chocolaty  pieces of brownie heaven and everyone was pretty happy. Needless to say these didn’t last very long, they were pretty much wiped out as a testament to the tastiness.

Chocolate Brownie5 Chocolate Brownie3

These were epic, delicious and like a warm chocolaty hug, however still not the brownie I’m looking for. The top was cracked and inviting and the brownie itself was thick, fudge richness. I used this French Chocolate Brownie recipe and I would definately recommend it to anyone! In fact it will probably make an appearance here soon!

Chocolate Brownie7 Chocolate Brownie1 Chocolate Brownie8

So if anyone out there has a great brownie recipe for me to try leave a comment. Also I want to add that going on a mission to find the perfect brownie is a great idea, even if I don’t find what I’m looking for I still get delicious brownies to console me.


Lemon Blueberry Cake

IMG_2191edit

January and February is a month of birthdays, anniversaries and other general celebrations. This mean’s one thing, festive cake is pretty much in order every week for atleast the first two months of the year. It’s definately one way to start every year!

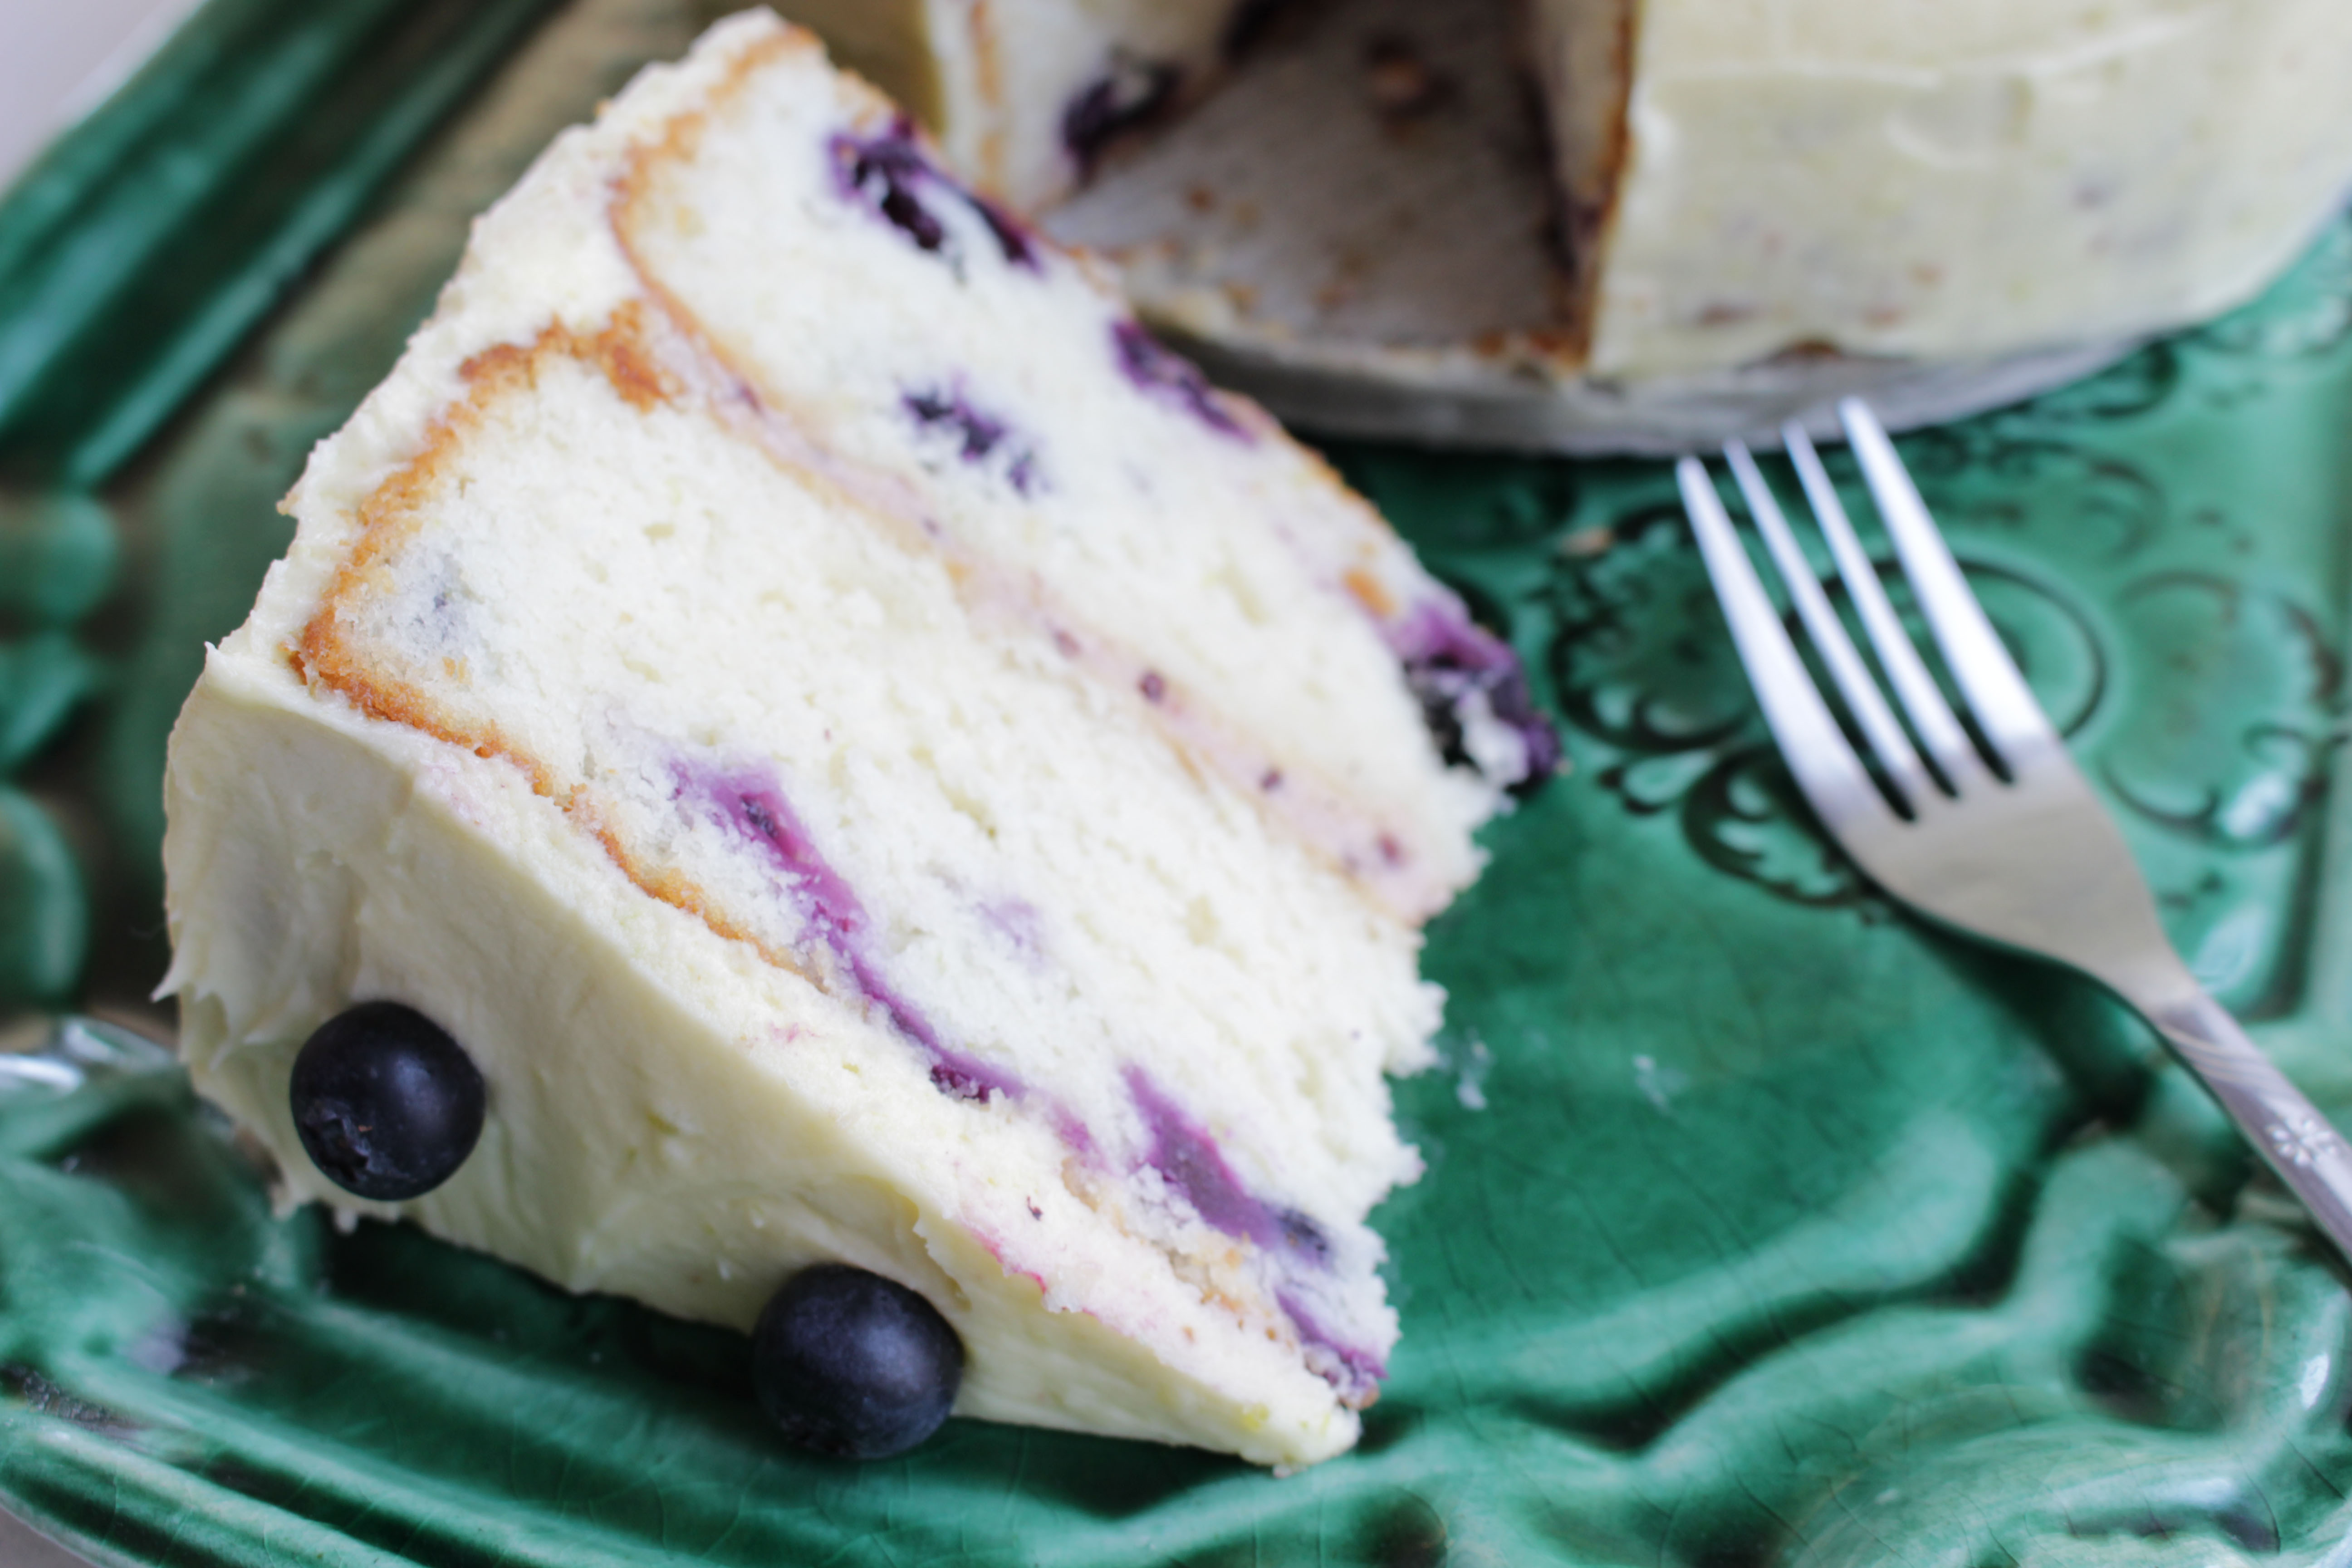
For my Husbands birthday this year I made him a scrumptious lemon and blueberry cake with lemon cream cheesed frosting. Blueberries are really only becoming popular in South Africa recently and they are really expensive. It is really hard to resist using all the colorful berries when they’re in season but the price is a huge turn off. A birthday however is a perfect excuse to go all out on fresh berries.

IMG_2190edit

This cake is really moist and tasty, the lemon flavour isn’t overwhelming but gives the cake a great citrus flavour and the general rule is the more berries the better!

The flavour combination of lemon and blueberry is timeless and can we all agree that cream cheese frosting is the future of everything.

IMG_2198edit

IMG_2205edit

All I can say is that this cake is definately worth the time, it’s light and refreshing. On a totally seperate side note, holding off on eating dessert and cakes in order to take pics for the blog is way harder than you’d think.

IMG_2197edit


Recipe: Lemon Blueberry Cake with Cream Cheese Frosting

Ingredients:

For the Cake:
2 1/4 cups cake flour
1 tablespoon baking powder
½ teaspoon salt
1 ¼ cups buttermilk
4 large egg whites
1 ½ cups sugar
2 teaspoons grated lemon zest
1/2 cup unsalted butter, softened
1 teaspoon pure lemon juice

2 cups fresh blueberries

For the Cream Cheese Frosting:
250g cream cheese, softened
1 cup butter
2 teaspoons grated lemon zest
3 cups icing sugar

For Filling between layers:
1/2 cup seedless raspberry jam

Method:

  1. Pre heat the oven to 180C and make sure th erack is centred. Butter two 9 x 2 inch/ 23 x 5cm round cake pans and make sure to line the bottom of each pan with a round of greased baking or wax paper.
  2. For the Cake:

Mix together the flour, baking powder and salt.

Whisk together the buttermilk and egg whites in a seperate bowl.

Put the sugar and lemon zest in a mixer bowl or another large bowl and rub the lemon zest into the sugar until it releases a citrus scent and the sugar is moist.  Add butter to the sugar and lemon mix and then using a hand mixer or paddle attachment, beat until the butter and sugar are very light. Beat in the lemon juice.

Combine all ingredients: add one third of the flour mixture into the butter and sugar mixture whilst still beating on medium speed. Then add half of the milk-egg mixture, Continue this process untill all the remaining ingredients have been incorporated. The batter should be smooth and creamy. Give the batter a final mix to ensure that it is mixed well. Add the two cups of blueberries and gently fold into the mixed batter with a spatula. Divide the batter between the greased pans and tap the pans on a surface so the batter levels out.

Bake for 30-35 minutes, until the cakes have risen and a knife comes out clean.

Place the cakes on cooling racks and cool for about 10 minutes, then run a knife around the sides of the cakes, and remove cakes from tins, peel off baking or parchment paper. Allow cakes to cool completely before frosting

3. Cream Cheese Frosting:

In a mixing bowl combine cream cheese, butter and lemon zest. Beat on medium until creamy, light and fluffy. Gradually add 3 cups sifted icing sugar. Mix until frosting is light and creamy.

4. Assembling the cake:

Using a large serrated knife cut the slight domes off the top of each cake round. A great alternate option at this point would be to split each cake round in half and make a 4 layer cake, I however went with two substantial cake layers. Seperate, 3/4 cup of cream cheese frosting into a small bowl. Warm raspberry jam for 30 sec in a microwave until warm but not hot. Mix the warm jam into the 3/4 cup of cream cheese. Use this mixture as the filling between layers of the cake. Place bottom layer of cake onto a plate and then scoop the filling mix onto the top of the cake spread until even. Place second cake round on top. Ensure cake is level on top. Then spread or frost the cake using the cream cheese frosting. Decorate cake with leftover blueberries (that you haven’t eaten whilst baking…)

This is what love is!!

Valentines Day is almost upon us!!

I wanted to post this recipe mainly because I think it is the perfect treat for some Valentines Day celebrations or any celebrations, ok not even a celebration, at any time at all really.

IMG_2159edit

I’m having some difficulty naming this delicious tasty dessert since there are so many wonderful aspects and flavours. Rich white chocolate, vanilla bean , chocolate butter pastry, fresh berries, creamy marscapone cheese and delightful cream cheese.

IMG_2168edit

Then there’s the shape, I managed to make two one dainty and beautiful in a fluted tart pan and another rustic and wholesome in pie form both were delicious although the pie had more of the delicious filling. Finally, would the addition of cream cheese lean towards a part cheesecake making it a cheesecake pie/tart….

IMG_2130

Names such as

  • Black & White berry cheesecake pie
  • Chocolate Vanilla tart
  • Double Chocolate Berry pie….

URGH!!! I don’t know what to call it other than delicious and amazing!! Any suggestions???

So the story behind the tart/pie debate came about since I made both with one recipe. I made the tart for a dinner with friends and for the beautiful blog pictures and I made the other with the remaining batter and crust in pie form for family consumption. The tart was delicious and beautiful and I managed to halt us devouring it so I could take some beautiful pictures for the blog post but alas the pictures just weren’t as great as I wanted. It was so delicious I knew I had to try get better pictures with the pie version. Hence the identification debate.

IMG_2181edit

The inspiration for this dessert came about from Chocolate Marscapone Tarts over on La receta de la Felicidad and I used the pastry recipe which worked out perfectly. I completely redesigned the filling and i can vouch for how well it turned out.

IMG_2178edit


Recipe: Double Chocolate Vanilla pie wonder (Another name…)

Serves : 24cm Tart / 20cm Pie

Ingredients:

Crust:

  • 200 g flour (1 3/4 cup)
  • 40 g unsweetened cocoa powder (1/3 cup)
  • 1 pinch powdered cayenne pepper (optional)
  • 1 pinch of salt
  • 80 g sugar (1/2 cup)
  • 150 g butter, very cold, and cut into squares (2/3 cup)
  • 60 ml Full cream milk

Filling:

  • 100 g good quality white chocolate
  • 250 ml fresh cream
  • 100 g butter
  • 1 tub mascarpone cheese at room temperature
  • 1 Vanilla pod
  • 200 g Philadelphia Cream Cheese
  • 1/2 cup icing sugar (confectioners sugar, sifted)

Topping:

  • Strawberries or any berries of your choice
  • Chocolate sauce drizzle

Method:

  1. To prepare crust: Combine Flour, sugar, cayenne pepper and salt in a large bowl. Using a grater, grate butter into bowl and using your hands work the butter into the flour mix until mixture is crumbly. Slowly add milk to the mix until it combines and comes together. Cover dough and place in a freezer for 15 min whilst heating the oven to 180C /350F.
  2. Remove crust from freezer and roll into circular form that will comfortably fit into a tart pan or pie dish. Place crust onto tart pan/pie pan cutting away excess dough at the top. Blind bake pastry for 25 – 30 min at 180 C (350 F). Allow pastry to cool completely.
  3. To prepare Filling: Place a medium saucepan on a low heat setting with the fresh cream. Once cream comes to a light boil, remove from heat and add chopped white chocolate and butter. Stir until all ingredients melt. Add vanilla seeds from 1 vanilla pod and stir all to combine.
  4. In a seperate bowl using a hand mixer or stand mixer blend cream cheese and icing sugar together, until a smooth mix forms. Add marscapone cheese and blend again until smooth. Slowly add cream, butter and chocolate mixture into the cheese mix until a thin, smooth mix results.
  5. Once pastry is cooled add filling into pastry and refridgerate until set or overnight.
  6. Remove from pan and decorate with berries and chocolate sauce to your hearts content.

Don’t forget to let me know what you think.

Quick Classic Scones Recipe

IMG_2113

I had a happy “kuier” (visit) with some good friends yesterday, and even though I knew they were coming I didn’t think to make something yummy until they got here.

It’s for that reason and those moments when you’re caught by surprise that classic scones are the perfect rescue! They’re delicious, quick and generally all the ingredients you need should be at hand so with minimal effort you have tasty treats.

There are numerous recipes for scones available and I love making different variations of the original such as lemon-blueberry or chocolate chip but as mentioned this is the quickest surest thing! There are numerous variations of the traditional scone recipe and I have tried a few, the recipe that I use is a combination of a few attempts and various recipes.

IMG_2118edit IMG_2117edit IMG_2116edit


Recipe: Quick Classic Scones

Prep: 10 min           Cook: 15 min

Serves: 6-8

Ingredients:

  • 2 1/4 cup self-raising flour
  • ¼ tsp salt
  • 1 tsp baking powder
  • 1/3 cup butter, cut into cubes
  • 3 tbsp icing sugar
  • 3/4 cup milk
  • 1 tsp vanilla extract
  • 1 tsp lemon juice

To Serve:

  • Butter
  • Jam
  • Whipped Cream
  • Grated Cheese

Method:

  1. Heat oven to 180C/200C. Mix flour with salt, sugar and baking powder in a large bowl. Using a grater, grate butter into mixture. Using your hands mix the butter into the flour mixture until it’s crumbly.
  2. Put the milk into a cup and add vanilla and lemon juice.  Make a well in the middle of the flour mix and combine the liquid using a fork. The mix will initially be a little sticky.
  3. Scatter additional  flour into the bowl and fold the dough over a few times until the dough forms a smooth pliable shape. Scatter some more flour on teh work surface and tip the dough onto the work surface. Pat it into a circular shape roughly 1 inch thick and using a round cutter (5cm diameter) cut circular shaped scones.
  4. Reshape the remaining dough and repeat the process until you have between 6 or 8 scones and you’ve used all the dough. Brush the tops with beaten egg, then place onto the baking tray.
  5. Bake for 15 mins until risen and golden on the top.

Devour!! You can have these fresh out of the oven with an assortment of condiments as above or whipped cream with a splash of honey which is my current favorite . Or you can save it for later…which is unlikely.

IMG_2119dit